PixBuilder Documentation
current version: 5.2
This document can also be found online at http://support.pixfort.com/doc/flatpack/
Introduction
What it is PixBuilder is a Javascript script which allows users to customise HTML templates in a quick and easy way. PixBuilder allows basic content editing, allowing users to changes link text, headers and other written content.
HTML Builder runs (almost) entirely in the browser. The only server side code is in the form of a single PHP file used for exporting HTML markup.
What it's not (!)
PixBuilder is NOT a CMS (content management system). It does not provide a way for end-users to work on live websites and make changes to such websites.
For more information visit our support center
Before Installing
Requirements
To be able to use HTML Builder, you must have the following:
- PHP
- Apache webserver (Windows servers will probably work, but are not supported)
- An FTP tool to upload the files - Download Free FTP tool from here (FileZilla)
Installation
Installing the HTML Builder is simply a matter uploading the "builder" folder to a server/hosting account. Once uploaded, point your browser to builder's directory and the builder will work.
For example: www.yoursite.com/builder
*Note: don't upload the .zip file you downloaded from themeforest directly to your server, first unzip it, then upload the folder "builder" which is inside it.
Builder Update
To update the builder to the latest version please follow these steps:
- Download all the images in the directory "/elements/images/uploads/".
- Delete all the files of the old builder.
- Upload the new builder files to your server.
- Upload all the downloaded images from the old builder to the same directory at "/elements/images/uploads/".
- The builder is ready to use now.
*Note: please make a copy of your work before updating the builder by expoting it as .pixbuilder project.
Features
Drag and drop
HTML Builder allows users to drag HTML elements onto a canvas and drop them where they'd like them to appear. Once dropped onto the canvas, the position can be changed by dragging and dropping as well. Elements can be delete individually or all elements on the current page can be deleted in one go.
Content editing
The HTML Builder script can also be used to edit written content inside each element (simply by setting the "building mode" to "content"). HTML Builder uses a rich text editor, allowing to make changes to the written content. Depending on what type of element you're editing, certain options will be disabled in the editor. Editable text elements will need to be configured through "/js/builder.js", and depending on the exact configuration, certain text elements might not be editable.
Style/detail editing
The HTML Builder script also allows for basic CSS editing and link editing. Using the built-in CSS editor, end-users can customise whatever CSS attributes the script's admin has configured. When editing a link, the end-user can point the link to either an internal page or an (external) URL.
Link editing
The HTML Builder script allows user to edit links as well. To be able to edit links, firstly the link selectors will need to be added to the "editableItems" array in the /js/builder.js file. To edit links on the canvas, firstly select the Details building mode, this will allow you to select links. When selected, a "link" tab will be visible in the left panel, allowing you to either choose a page to link to or enter a URL manually.
Linking within a single page
When building a one-page website, you might want to link to sections within a single page rather then to a separate page. To do this, simply edit the link and use the second dropdown to choose the block you'd like to link to. The ID's to which can be linked, have to be configured within the block HTML files, and the ID attribute should be assigned to the first child element of the main container (for an example, please have a look at any of the bundled block files).
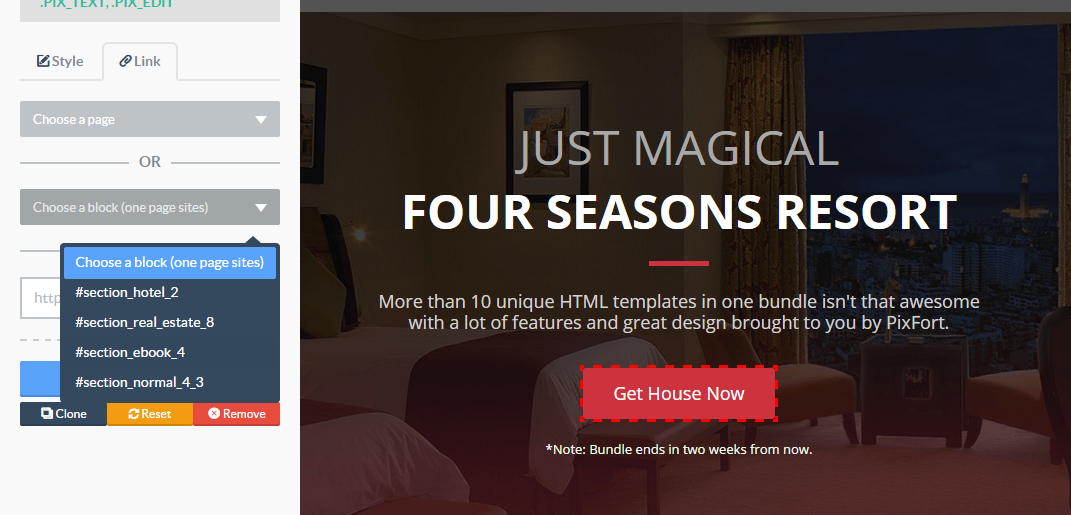
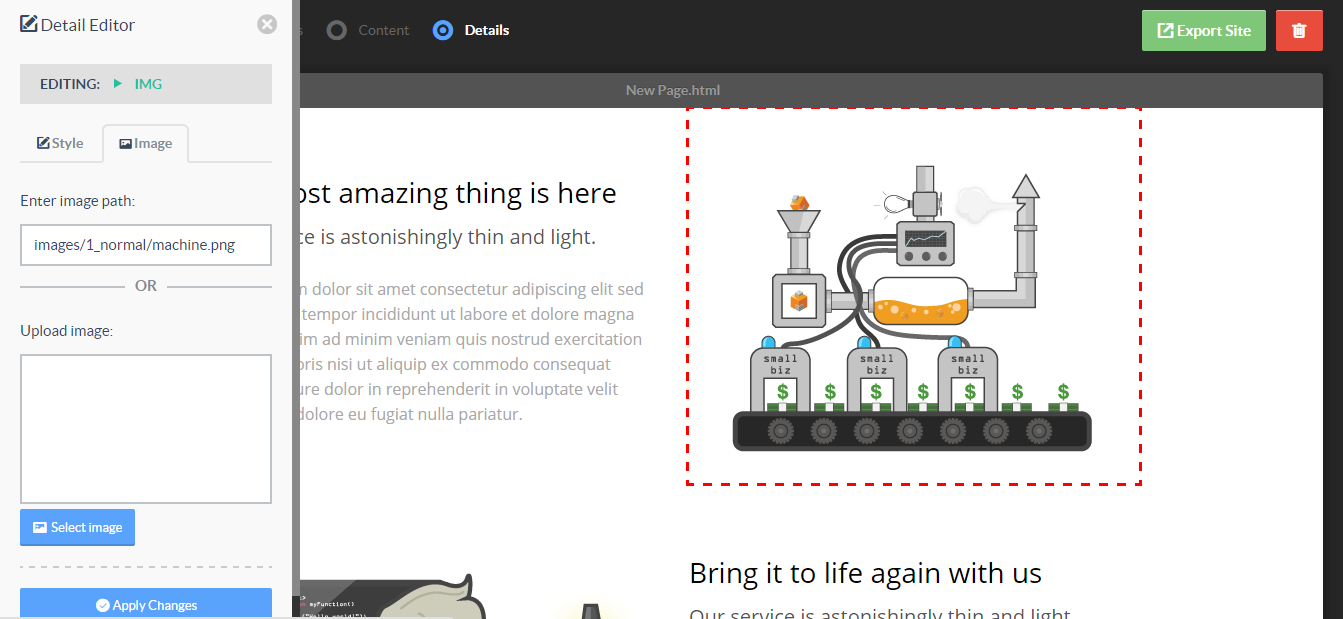
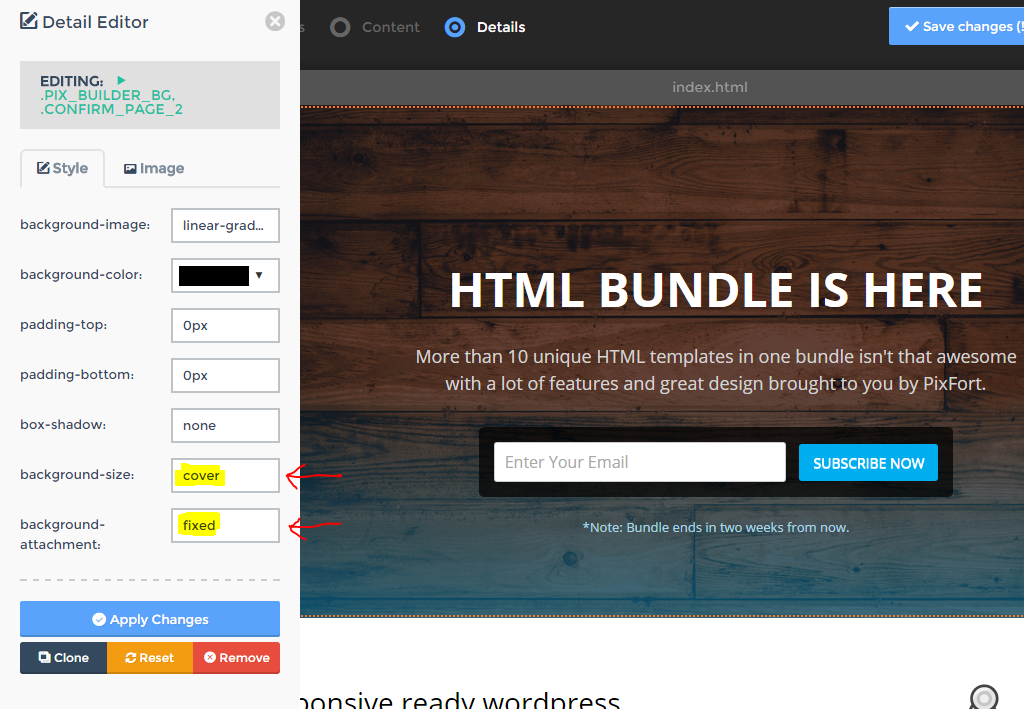
Image editing
The HTML Builder script allows user to edit images as well. To edit images on the canvas, firstly select the Details building mode, this will allow you to select images. When selected, a "image" tab will be visible in the left panel, allowing you to either upload an image or enter a URL manually.
- To change the image, input new image url inside url(), for example:
url(yourdomain.com/image.png)
- To remove the image, just input "url()"
* To make the background image parallax, set the "background-size to cover" and "background-attachment to fixed".
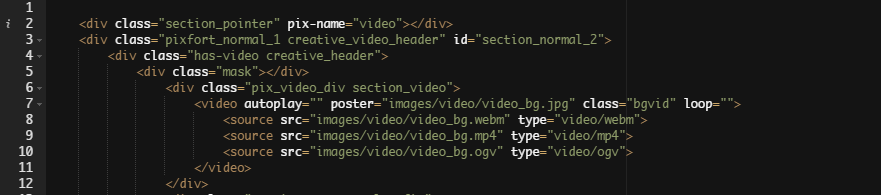
Video Background
To change section's background video, open the source code of the section and input the video url in the src attribute of the source tag, also input an alternative (poster) image that show in mobile devices instead of the video in the poster attribute in the video tag.
Cloning items
Items which have been setup in the "editableItems" array in /js/builder.js can be cloned. Switch to "Details" building mode, select the item which you want to clone and finally click the clone button from the left panel. Please note that cloned items will be inserted into the canvas right next to the original item.
Export HTML
Whenever the user is happy with the final result, the created markup can be exported by click the green export button. The export feature will grab all the used HTML elements for each created page. Once all pages are completed, all the HTML files are bundled into a ZIP archive together with the other external resources like stylesheets, Javascript files and images which will be downloaded by the end user.

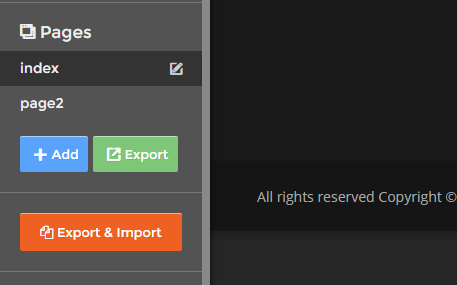
Export & Import .pixbuilder Projects
You can at any time export a copy of the landing page project you are working on as a "project.pixbuilder" file which you can import it later to the builder and continue editing.
To export or import a project open the left sidebar and click on the button "Export & Import" in the bottom of the sidebar.
*Note: after the import process all the current landing pages will be deleted! so make sure to make a copy of your current work by exporting it from the export button above it in the same window (project.pixbuiledr) file.
Preview HTML
To preview a page click on the preview button in the top bar, you can only preview a single page; links to other pages won't work. When you make changes to your page, reloading the preview won't work, instead you'll have to use the "Preview" button again.
Pages
The HTML Builder script allows users to create multiple pages at once. To add a new page, simply click the green button labeled "+ Add" just below the current pages list. You can alter the page names as well (please use names without the .html extension, these are added automatically during the export). When exporting the markup, the pages will use the same names. To delete a page, simply click the little delete icon next to the page you'd like to delete.

Popups
If you want to add a popup to your landing page, the popup's script should be included in the page's code in order to work, but in case you are using one of the predefined popup sections in the builder, here you don't need to add the popup's script to the page, because it's already exist in the section's source, and if you want to add this popup to another links and buttons in the page, just switch to Details mode, press on the link or the button, then put the #popup_id in the link field, for example #popup_1.
You can watch this video for Editing & Customizing PixBuilder Predefined Popups:
https://www.youtube.com/watch?v=-AEWipK9HR8&list=PLhuQqRln0YTH0bk1_akRxB62iYwTIM81r
If you are not using any of the predefined popup sections in the builder, then you have to add the popup's code to the page, and to do that just copy the popup's code from the knowledge base article and paste it in any section's source in the builder after the existing code and the popup will work in the entire page, then to add the popup to links and buttons, just switch to Details mode, press on the link or the button, then put the #popup_id in the link field, for example #popup_1.
To edit the popup just switch to Content mode, press on popup's link or button, then switch to Details mode and customize the popup style as usual.
For more information please check our knowledge base article about adding new Popups to your landing page:
http://support.pixfort.com/knowledgebase/popups/
Setting up Forms
Setting up forms in the Builder
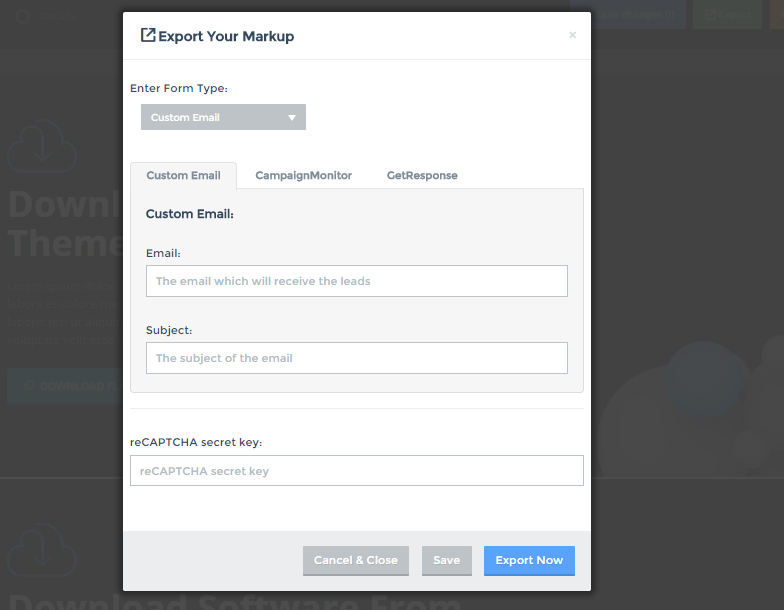
To set up all the forms used inside the builder, simply you just need to choose the mail service provided (Form Type) when you click on the export button inside the builder, then you fill the required information for the email service provided that you choosed (the info for the other email service providers is not required).
Form Type:
1- Custom Email:
When you choose "Custom Email" as a form type in you landing page you will receive all the suscription submited in the forms directly to your email that you choose in the email field, also you should input the subject of the received emails in the subject field.
2- MailChimp:
To send the submited date to your MailChimp account you should input the following informatio:
Your API key from here - http://admin.mailchimp.com/account/api
List unique id from here - http://admin.mailchimp.com/lists/
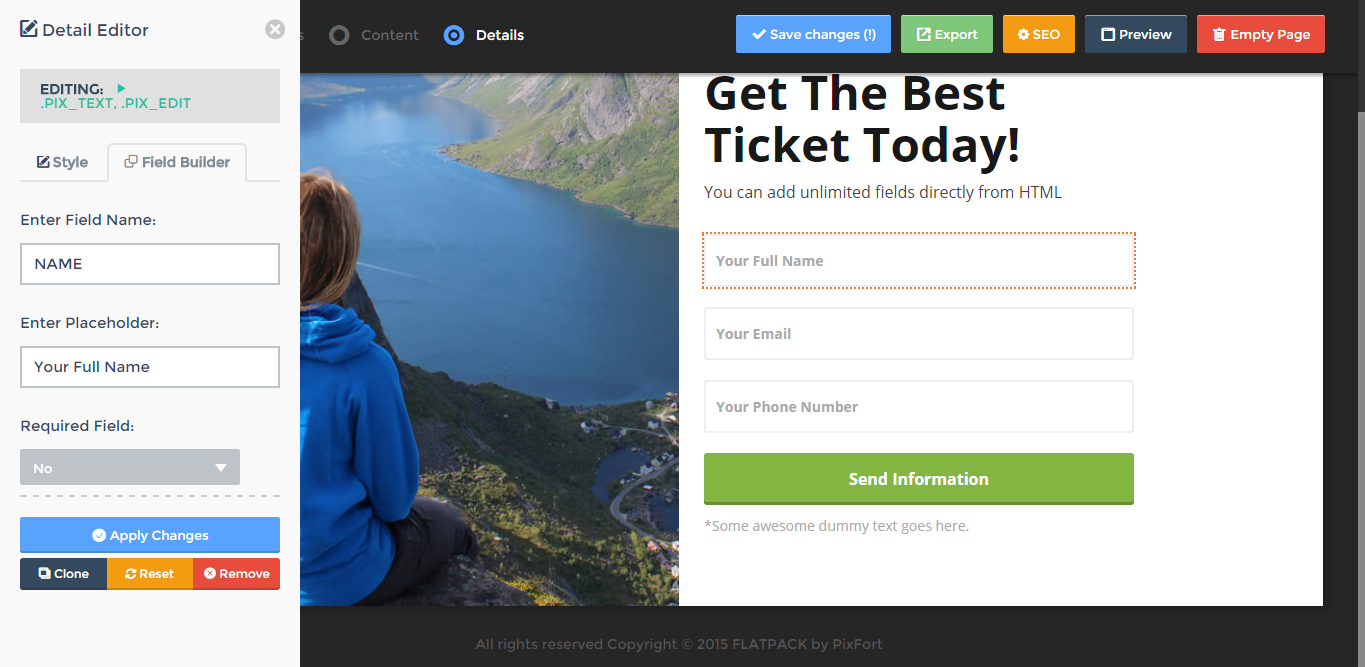
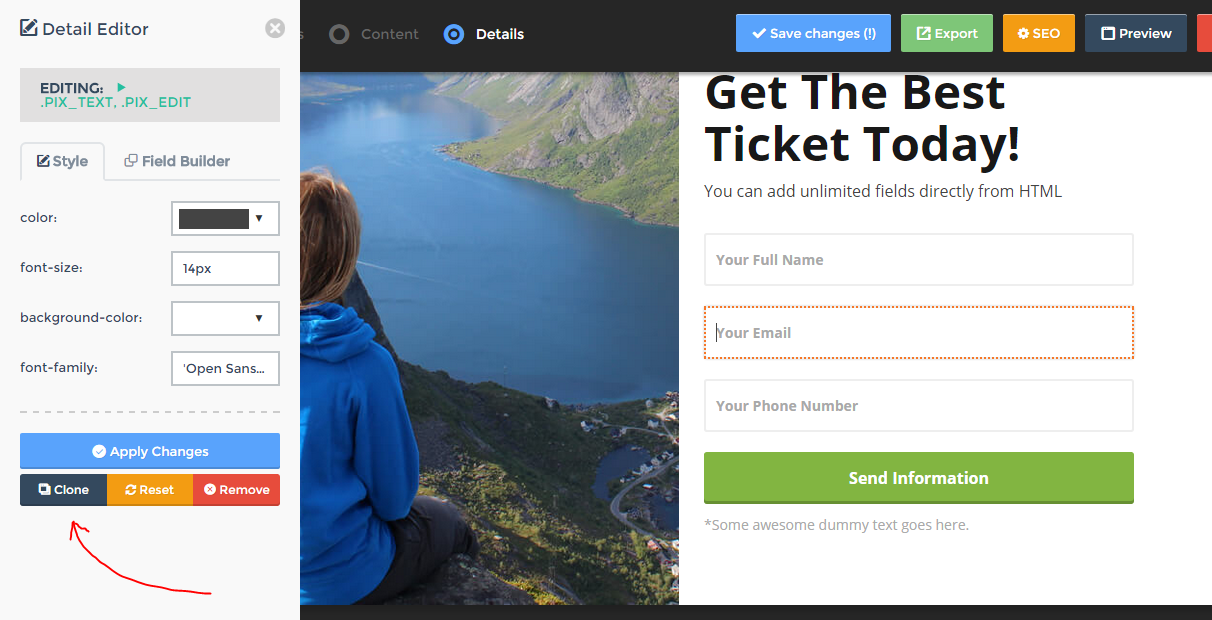
And you should make sure that each field of the form has the same name in your mailchimp account, to change field's name simply switch the builder to the "Details" mode then click on the fields, then open "Field Builder" tab and here you can change field's name, place holder and change if it's requiered or not.
3- Campaign Monitor:
To send the submited date to your Campaign Monitor account you should input the following informatio:
Your API key (change your-username with your own username) - https://your-username.createsend.com/admin/account/
List id from here - https://www.campaignmonitor.com/api/getting-started/#listid
And you should make sure that each field of the form has the same name in your Campaign Monitor account, to change field's name simply switch the builder to the "Details" mode then click on the fields, then open "Field Builder" tab and here you can change field's name, place holder and change if it's requiered or not.
4- GetResponse:
To send the submited date to your GetResponse account you should input the following informatio:
Your API key from here - https://app.getresponse.com/my_api_key.html
Campaign name from here - https://app.getresponse.com/campaign_list.html
And you should make sure that each field of the form has the same name in your GetResponse account, to change field's name simply switch the builder to the "Details" mode then click on the fields, then open "Field Builder" tab and here you can change field's name, place holder and change if it's requiered or not.
5- AWeber:
To send the submited date to your AWeber account you should input the following informatio:
Your Authcode from here - https://auth.aweber.com/1.0/oauth/authorize_app/647b2efd
List name from here - https://www.aweber.com/users/autoresponder/manage
And you should make sure that each field of the form has the same name in your AWeber account, to change field's name simply switch the builder to the "Details" mode then click on the fields, then open "Field Builder" tab and here you can change field's name, place holder and change if it's requiered or not.
6- ActiveCampaign:
To send the submited date to your ActiveCampaign account you should input the following informatio:
Your API URL Go to My Settings -> Developers
API Key: Go to My Settings -> Developers
List id
And you should make sure that each field of the form has the same name in your ActiveCampaign account, to change field's name simply switch the builder to the "Details" mode then click on the fields, then open "Field Builder" tab and here you can change field's name, place holder and change if it's requiered or not.
7- MailerLite:
To send the submited date to your MailerLite account you should input the following informatio:
Your API Key from here - https://app.mailerlite.com/integrations/api/
List ID from here - https://app.mailerlite.com/integrations/api/
And you should make sure that each field of the form has the same name in your MailerLite account, to change field's name simply switch the builder to the "Details" mode then click on the fields, then open "Field Builder" tab and here you can change field's name, place holder and change if it's requiered or not.
7- FreshMail:
To send the submited date to your FreshMail account you should input the following informatio:
Your API Key from here - https://app.freshmail.com/en/settings/integration/
API Secret from here - https://app.freshmail.com/en/settings/integration/
List ID: Go to list -> Parameters
And you should make sure that each field of the form has the same name in your FreshMail account, to change field's name simply switch the builder to the "Details" mode then click on the fields, then open "Field Builder" tab and here you can change field's name, place holder and change if it's requiered or not.
8- Sendloop:
To send the submited date to your Sendloop account you should input the following informatio:
Your API Key: Go to Settings -> API Settings
Your subdomain
List ID: Go to list -> Parameters
And you should make sure that each field of the form has the same name in your Sendloop account, to change field's name simply switch the builder to the "Details" mode then click on the fields, then open "Field Builder" tab and here you can change field's name, place holder and change if it's requiered or not.
9- Sendy:
To send the submited date to your Sendy account you should input the following informatio:
Your API Key: Go to Settings -> API Settings
Your subdomain
List ID: Go to list -> Parameters
And you should make sure that each field of the form has the same name in your Sendloop account, to change field's name simply switch the builder to the "Details" mode then click on the fields, then open "Field Builder" tab and here you can change field's name, place holder and change if it's requiered or not.
Using Multiple Email Service Provideders in the same page:
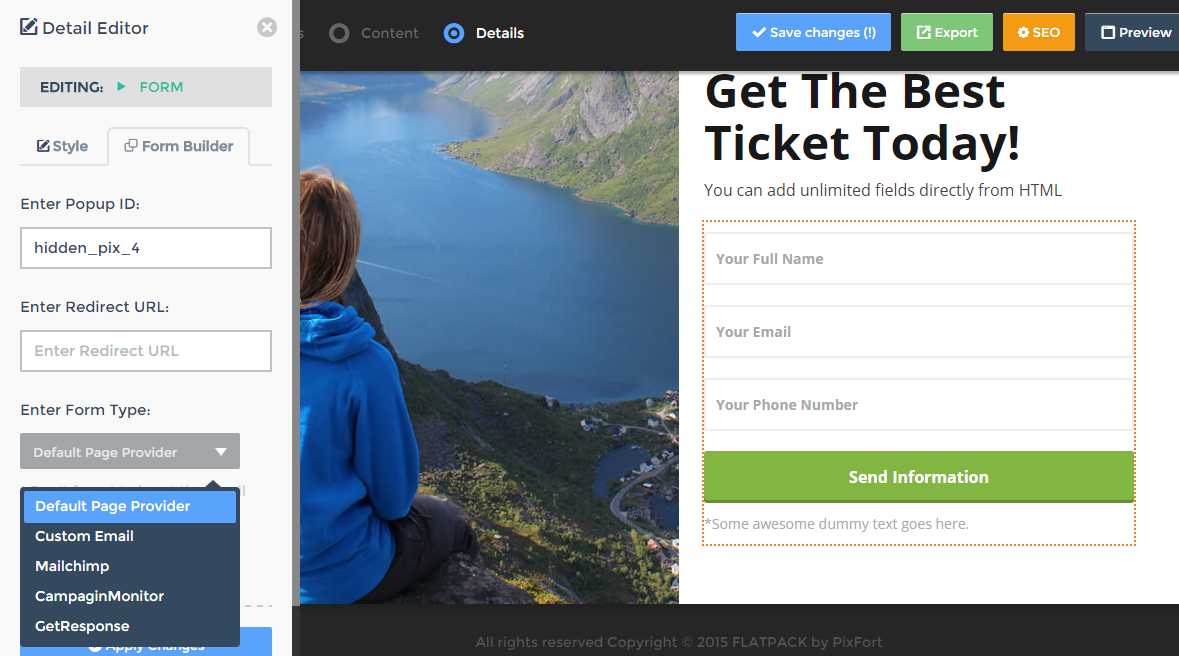
If you want to use multiple email service provideres in the same page simply switch the builder to the "Details" mode then click on each form then open "Form Builder" tab and then choose "Form Type" for this form.
Don't forget to input the requiered information for the email service provider before exporting the landing page (click on the export button in the builder and fill the required information the export HTML).
Adding new fields to the Form:
To add new fields to the forms simply switch the builder to the "Details" mode then click on any field then click on the "clone" button, after that you can click on the new generted field and change it's options (name, placeholder,...).
You can watch this video for Adding new fields to the Form:
https://www.youtube.com/watch?v=GcYjUQ82XeI&feature=em-upload_owner
Setup froms after export & in Predefined Pages
If you are using one of the predefined landing pages or you exported the landing page from the builder and you want to edit the email service provider for the forms in the page simply follow these steps:
- Open the folder "pix_mail".
- Open the file "config.php".
- In line number (2) input the email service provider that you want to use as following:
- "ce" for Custom Email.
- "mc" for Mailchimp.
- "cm" for Campaign Monitor.
- "gr" for GetResponse.
- For the used email service provider input the required information as following:
- Custom Email setting lines (4 & 5), input your Email address and email's subject.
- Mailchimp setting lines (12 & 13), input your API Key and List ID.
- Campaign Monitor setting lines (16 & 17), input your API Key and List ID.
- GetResponse setting lines (20 & 21), input your API Key and Campaign name.
- Save the file and your form will be ready to use.
Setup reCAPTCHA in forms
Step 1
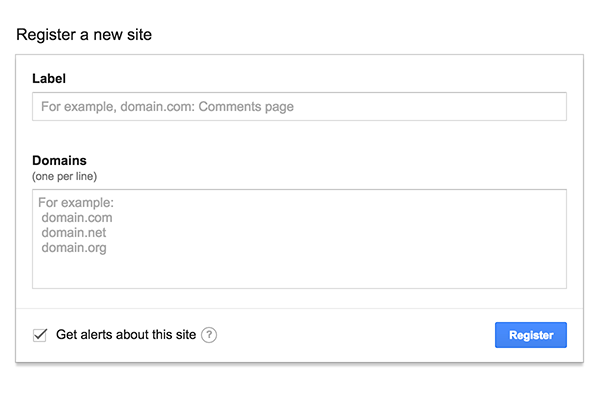
First, we need an API key, so head on over to https://www.google.com/recaptcha/admin. To gain access to this page you’ll need to be logged into a Google account. You’ll be asked to register your website, so give it a suitable name, then list domains (for example tutsplus.com) where this particular reCAPTCHA will be used. Subdomains (such as webdesign.tutsplus.com and code.tutsplus.com) are automatically taken into account.
Step 2
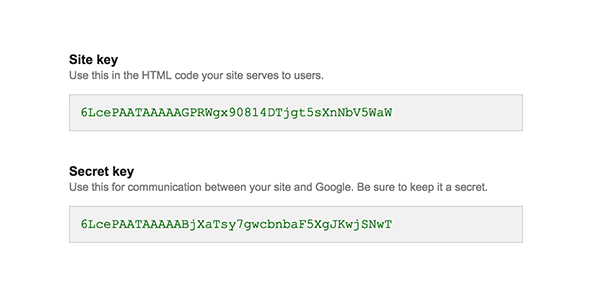
With that done you’ll be given a site key and its partner secret key:
Step 3
Next, you will need to add the Google reCAPTCHA to the form in your page, to do this switch the builder to the "Details" mode then click on the form, then open the "Form builder" tab from the left sidebar, then click on "Add Google reCAPTCHA" button to add the reCAPTCHA to the form.
Step 4
To configure the reCPATCHA widget, switch the builder to the "Details" mode then click on the reCAPTCHA, then open the "reCAPTCHA" tab from the left sidebar then input your Google site key.
You can optionally choose the theme of the reCAPTCHAT (Light or Dark) from the drop-down menu.
Step 5
Click on the "Export" button inside the builder, then fill in the reCAPTCHA secret key field.
After that the reCAPTCHA will be ready to use.
Note that the reCAPTCHA will only work after exporting the project and uploading it to your website (the website that you registered on Google reCAPTCHA admin page) and it will not work inside the builder or in the preview.

Setup PayPal forms
To edit the Paypal after you add it to your landing page via the builder, first switch the builder to the "Details" mode then click on the form, then open the "PayPal Builder" tab from the ledt sidebar, after that you can easily change the values of the fields (your paypal email, item name, item price, successful return URL, cancel return URL and notify URL).
Setup PayPal notification emails
1. Find you Notification URL
After you export the landing page and upload it to your server you should find the full URL of the file "paypal_ipn.php" which is inside the folder "pix_mail", for example if you uploaded the landing page to your root directory the full notification URL will be:
http://www.yourdomain.com/pix_mail/paypal_ipn.php
And if you upload the landing page to a sub-directory the URL will be:
http://www.yourdomain.com/landing_page/pix_mail/paypal_ipn.php
2. Setup Your PayPal account
To setup IPN (Instant Payment Notification) you will need to have a Business account, after that follow these steps:
- Login to your Paypal account.
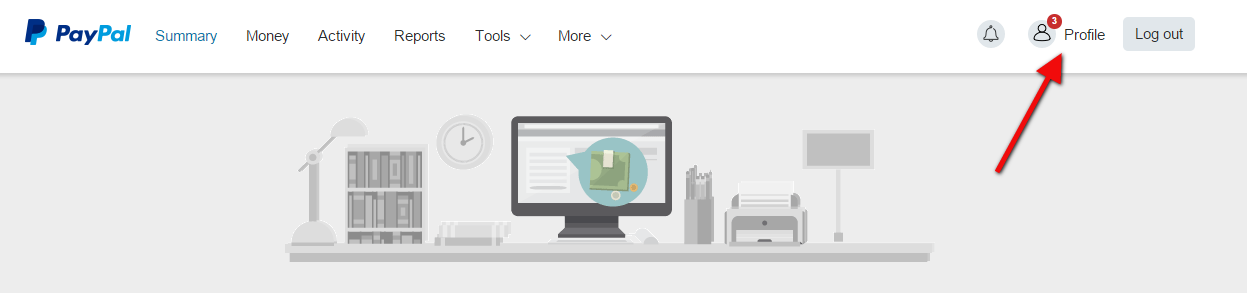
- Click on "Profil".
- Click on "Profile and Settings".
- From the left sidebar, click on "My Selling tools".
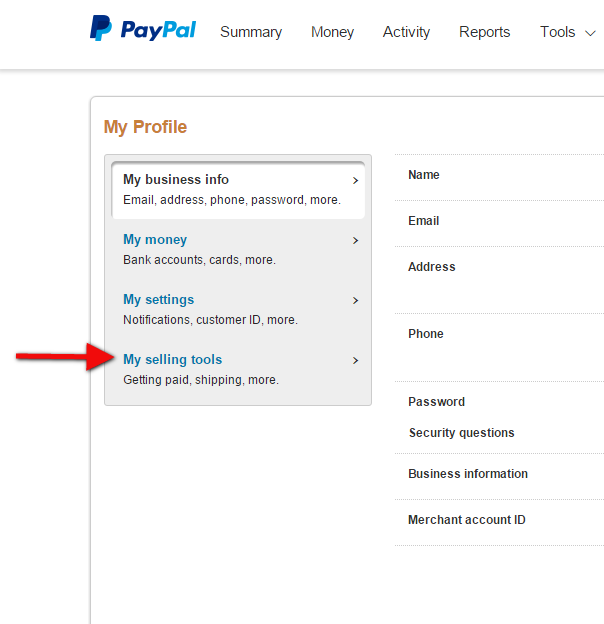
- Click "update" button next to "Instant payment notifications".
And click "Choose IPN Settings" after that.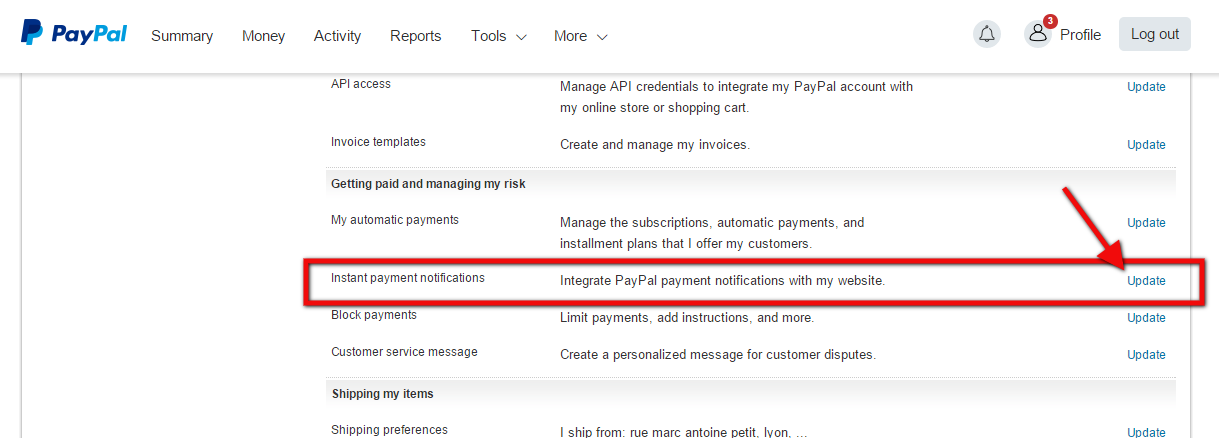
-
After the input the URL of the file "paypal_ipn.php" (which is inside the folder "pix_mail") in the Notification URL field and choose "Receive IPN messages" option, and click save after that.
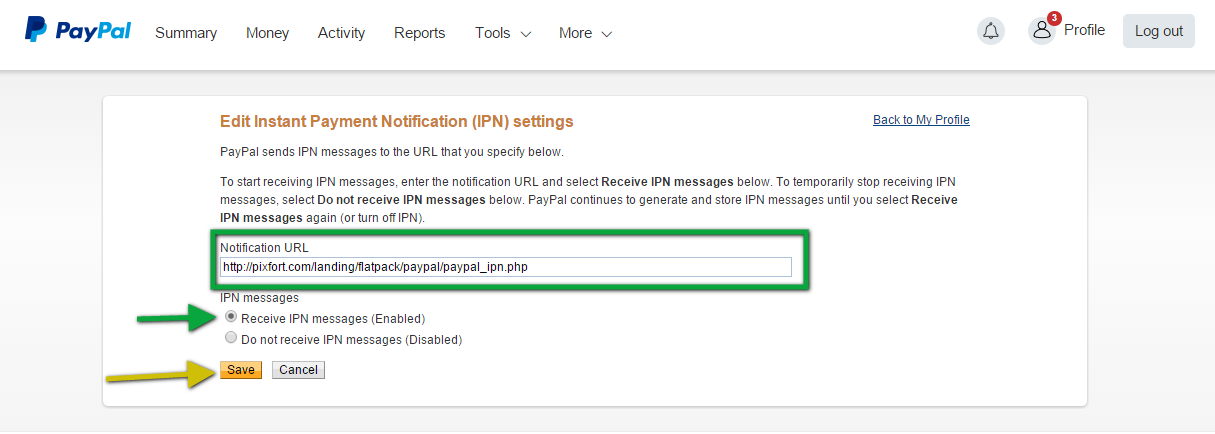
- The PayPal should be working now, on every purchase you will recieve an email with all oreder details and status, and the buyer will receive also an email with his order deatils to confirm his purchase.
For more information you can check these usefull links:
How to check that the IPN Notifications are working on your website:
-
After you export the landing page open the file "/pix_mail/paypal_ipn.php" and change the "USE_SANDBOX" in line 13 to 1:
define("USE_SANDBOX", 0);So it will be:define("USE_SANDBOX", 1); -
Then upload the landing page files to your server, after that you should find the full URL of the file "paypal_ipn.php" which is inside the folder "pix_mail", for example if you uploaded the landing page to your root directory the full notification URL will be:
http://www.yourdomain.com/pix_mail/paypal_ipn.php
And if you upload the landing page to a sub-directory the URL will be: http://www.yourdomain.com/landing_page/pix_mail/paypal_ipn.php
- After that go to: https://developer.paypal.com/developer/ipnSimulator/
- Then login to your account (from the login button on the top right corner).
-
After that input the Notification URL in the first field "IPN handler URL".
- You can choose any Transaction type to test with your website, for example choose "eCheck - complete".
-
In the "receiver_email" input your email address.
In the "payer_email" input any other email address which you will test as buyer email. - Then click on the button "Send IPN", and you should receive two emails on seller and buyer email addresses.
How to edit and add complex PayPal price fields
You can use simple PayPal form in your landing page, which has one price by using the "amount" field into the form:
<input type="hidden" name="amount" value="15.00">If you want to add complex PayPal form (multiple prices), first you add the "select" code to let the client choose a plan to order:
<select name="os0" required="" aria-required="true">
	<option value="">Choose a Plan</option>
	<option value="Normal">Normal $9.99 USD</option>
	<option value="Premium">Premium $14.99 USD</option>
	<option value="Pro">Pro $24.99 USD</option>
</select>
Where the value of each option is the name of the plan.
After that you add this code inside the form, for each options you added in the previous code you add ("option_select" with value of the name) and ("option_amount" with value of the price of the option), with adding the order (number) at the end of field name.
<input type="hidden" name="option_select0" value="Normal">
<input type="hidden" name="option_amount0" value="9.99">
<input type="hidden" name="option_select1" value="Premium">
<input type="hidden" name="option_amount1" value="14.99">
<input type="hidden" name="option_select2" value="Pro">
<input type="hidden" name="option_amount2" value="24.99">
<input type="hidden" name="option_index" value="0">
For more information please check:
HTML Variables for PayPal Payments StandardHow to add quantity field to PayPalform
To add quantity field to your PayPal form you need to add a "select" field with the amount of the quantity options and thier visible titls:
<select name="quantity" required="" aria-required="true">
	<option value="">Choose Quantity</option>
	<option value="1">1 Ticket</option>
	<option value="2">2 Ticket</option>
	<option value="3">3 Ticket</option>
</select>
For more information please check:
HTML Variables for PayPal Payments StandardSetup Eventbrite
To add Eventbrite popup to the landing page please follow these steps:
- Open your account on Eventbrite.
- Click on "Manage Events".
- Click "Manage" on the event you want to add.
- Click on the "Widgets" from the left sidebar (under the "Invite & Promote" section).
- Click on "Ticket Form".
- Copy the code of the "iframe" only (without the div).
so the code "before" should look like:<div style="width:100%; text-align:left;" ><iframe src="//eventbrite.com/tickets-external?eid=21069420203&ref=etckt" frameborder="0" height="260" width="100%" vspace="0" hspace="0" marginheight="5" marginwidth="5" scrolling="auto" allowtransparency="true"></iframe><div style="font-family:Helvetica, Arial; font-size:10px; padding:5px 0 5px; margin:2px; width:100%; text-align:left;" ><a class="powered-by-eb" style="color: #dddddd; text-decoration: none;" target="_blank" href="http://www.eventbrite.com/r/etckt">Powered by Eventbrite</a></div></div>
And you copy only the "iframe" which should look like:<iframe src="//eventbrite.com/tickets-external?eid=21069420203&ref=etckt" frameborder="0" height="260" width="100%" vspace="0" hspace="0" marginheight="5" marginwidth="5" scrolling="auto" allowtransparency="true"></iframe>
-
After that paste the iframe code inside this code (directly after the comment text):
<div id="popup_2" class="well pix_popup pop_style_1 pop_hidden light_gray_bg pix_builder_bg">
        <div style="width:700px;text-align:left;" >

            <!-- THE IFRAME CODE HERE -->

	</div>
</div>
So the code should look like this:<div id="popup_eventbrite" class="well pix_popup pop_style_1 pop_hidden light_gray_bg pix_builder_bg"> <div style="width:700px;text-align:left;" > <!-- THE IFRAME CODE HERE --> <iframe src="//eventbrite.com/tickets-external?eid=21069420203&ref=etckt" frameborder="0" height="260" width="100%" vspace="0" hspace="0" marginheight="5" marginwidth="5" scrolling="auto" allowtransparency="true"></iframe> </div> </div> - After that you can paste this code inside your landing page (at any place, for example at the end of the page), and you can open the eventbrite popup by changing the link of any button to "#popup_eventbrite".
The button link should be like this:<a href="#popup_eventbrite">Eventbrite POPUP BUTTON</a>